In some circumstances (usually in physical environments) it may be to necessary to rebuild an entire exchange server. This method requires a complete reinstall of Windows and Exchange from the ground up, and a restoration of the Information Stores on the existing physical/virtual server or on a completely different physical/virtual server. It will be necessary to use this method after an incident where:
- Windows is unbootable and unrecoverable.
- Exchange is damaged to the extent where it will not run.
- Physical failure of the server.
- Restore images or IDR media are not available.
Install Windows
The installation of Windows is beyond the scope of this tutorial but a detailed procedure can be found here.
- Windows installation can be done from the ground up using Windows Media or from an image.
- Install drivers.
- Install all service packs & updates.
- It is important that the partition structure matches the configuration of the original server for the restoration of the information stores. This can be changed after the restoration if required. The information stores have to be restored onto a physical disk and not a networked drive.
- Make sure the Windows exchange components are installed. Go to ‘Add and Remove Programs’ -> ‘Install Windows Components’ and make sure that ASP.NET, NNTP, and SMTP are installed from the Windows Server media.
Join the Server to the Domain
If the machine you are recovering is on different hardware or has been reinstalled from the ground up, you can keep the same computer name but before joining it to the domain there are a couple of things that MUST be done before you do.
- Firstly, rename the machine to match the old one but do it into a workgroup and restart.
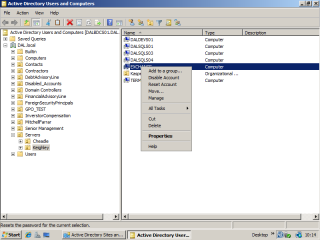
- Then, in ADUC find the exchange server, right click, and ‘reset’ the computer account. This is important.
- Now join the server to the domain in the usual manner and restart.
This completes the Windows preparations, now it’s time to start installing and recovering Exchange.
Install Exchange
Active Directory still holds the configuration for the Exchange server, so the installation needs to be started in recovery mode using the /DisasterRecovery switch. This will restore the default Exchange registry settings and configuration without changing the configuration held in AD.
- Go to the run command and type:
CDDRIVE:\setup.exe /DisasterRecovery
Note. If there has been a bigger failure including domain controllers or there have been changes to the domain controller configuration or Schema Master, then it may be necessary to run setup with /ForestPrep and /DomainPrep switches first.
- Once the installation starts, click ‘Next’. Then agree to the licensing agreement and click ‘next’ again.
- Now select the components to be installed. You should see that the selected components are all being installed in ‘Disaster Recovery’ mode. Then click ‘Next’.
- If your Exchange organisation has multiple Adminstrative and routing groups you should now see a request asking you which routing group the server is to be installed into. Select the correct one and then click ‘Next’.
- The installation wizard will then install the various components of Exchange through to completion.
- Once the installation is complete, install the service packs that were on the previous server. This also needs to be done using the /DisasterRecovery switch.
- Go to the run command and type:
CDDRIVE:\E2K3SP2\Setup\i386\update.exe /DisasterRecovery
- The installation will go through exactly the same stages as the initial installation of Exchange.
- When complete, DON’T REBOOT THE SERVER. Check that the information stores are present in system manager and that they are in a dismounted state ready for the restoration of the information stores.
